Converting a WordPress site from Elementor to Gutenberg involves manually recreating content using the native Block Editor to improve page speed and Core Web Vitals. The modern process requires establishing a global theme.json file for styling, creating a Synced Pattern library for recurring layouts, and performing a deep database cleanup to remove leftover _elementor_data meta keys.
Why Migrate from Elementor to the Block Editor?
Migrating to the native Block Editor (Gutenberg) is primarily a performance optimization strategy. By removing the heavy DOM wrapper elements (div > div > div nesting) typical of page builders, you significantly reduce the DOM Sizeand Payload.
- Reduced Bloat: Elimination of unused JavaScript and global CSS files.
- Improved Core Web Vitals: Lower Interaction to Next Paint (INP) and faster Largest Contentful Paint (LCP).
- Future-Proofing: Full alignment with WordPress Core and Full Site Editing (FSE).
- Local SEO Tip: For businesses targeting specific regions with developing infrastructure (e.g., parts of Southeast Asia or rural markets), a lighter DOM is crucial. High latency on mobile 4G networks means that every kilobyte of code reduction translates to significantly faster load times, directly improving your local map pack rankings and reducing bounce rates.
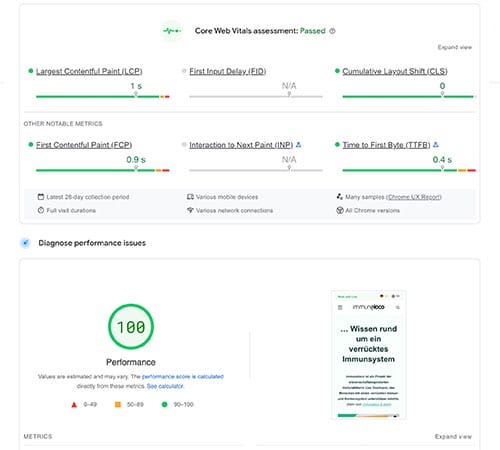
Performance: The Speed Advantage of Gutenberg
This is the primary reason for most migrations. Elementor’s code, while flexible, is often heavier and can slow down your site. Gutenberg produces much cleaner, lighter HTML. Migrating can dramatically improve your Core Web Vitals and provide a noticeably faster experience for your users.
Simplicity & Maintenance: Working with the WordPress Core
Gutenberg is the native WordPress editor. By using it, you reduce your reliance on a major third-party plugin. This means fewer potential conflicts, a cleaner backend, and a website that is more aligned with the future of the WordPress platform.
Cost: Elementor Pro vs. Free Gutenberg Block Plugins
Elementor Pro comes with an annual subscription fee. While powerful, much of its functionality can now be replicated using free, high-quality Gutenberg block add-on plugins like Kadence Blocks or Spectra.
Elementor vs. Gutenberg: A Quick Comparison Table
|
Feature |
Elementor |
Gutenberg |
|---|---|---|
|
Learning Curve |
Low (Visual Drag-and-Drop) |
Moderate (Requires understanding Blocks) |
|
Performance |
Slower, more code overhead |
Faster, produces clean and light code |
|
Ease of Use |
Very visual, far superior than Gutenberg |
Simple and fast for content creation |
|
Design Flexibility |
Very high |
Not as good as Elementor |
|
Future-Proof |
Dependent on the Elementor company |
The official future of WordPress |
|
3rd Party Add-on |
Elementor has most comprehensive add-ons on the market |
Not as many as Elementor |
|
Premade Templates |
Huge collections of pre-made templates from 3rd party |
Not as many as Elementor |
|
Reusability |
Global Widgets |
Synced Patterns & Pattern Overrides |
Phase 1: Essential Preparation (Do Not Skip)
Step 1: Research & planning.
For every website revamp, planning is super important. Converting from Elementor to Gutenberg isn’t just a technical change, it’s a strategic decision that affects your site’s performance, maintenance, and future growth.
Essential planning activities:
- Inventory your current site: Document all pages, posts, and custom functionality
- Define conversion goals: Speed improvement targets, budget constraints, timeline requirements
- Resource assessment: Determine available time, technical skills, and budget for the project
- Success metrics: Establish measurable goals like page load time improvements or cost savings
- Risk mitigation: Identify potential problems and create contingency plans
- Timeline planning: Set realistic deadlines for each conversion phase
Key planning questions:
- Which pages are most critical to your business and should be converted first?
- What Elementor features do you actually use versus what’s just nice to have?
- How will you handle the learning curve for team members who edit content?
- What’s your backup plan if conversion takes longer than expected?
- How will you measure success after the conversion is complete?
Documentation checklist:
- Screenshot all important page layouts for reference
- List all Elementor widgets and features currently in use
- Note any custom CSS or JavaScript that needs preservation
- Document third-party integrations and their dependencies
- Create a priority list of pages/features by business importance
Step 2: Perform a Complete Website Backup
Never attempt conversion without comprehensive backups. Your backup should include files, database, and configuration settings.
Essential backup components:
- Full file backup: All WordPress files, themes, plugins, uploads
- Database backup: Complete MySQL/MariaDB export
- Configuration files: .htaccess, wp-config.php, any custom configurations
- Test restore process: Verify backups actually work before proceeding
Recommended backup methods:
- Use your hosting provider’s backup tools
- Implement UpdraftPlus or similar backup plugins
- Manual FTP and database exports as redundancy
- Store backups in multiple locations (cloud and local)
Step 3: Set Up a Staging Environment (Crucial)
Never perform conversions on live websites. Staging environments allow testing without affecting your active site.
Staging setup options:
- Hosting provider staging: Many Malaysian hosts offer one-click staging
- WordPress staging plugins: WP Staging, Duplicator Pro
- Local development: XAMPP, Local by Flywheel, or DevKinsta
- Subdomain staging: Create staging.yourdomain.com manually
Staging environment checklist:
- Exact copy of live site data
- Matching PHP and WordPress versions
- All plugins and themes replicated
- Database synchronised with live site
- SSL certificate configured (even if self-signed)
Step 4: Audit Your Existing Elementor Pages and Content
Understanding your current Elementor usage helps plan the conversion strategy and identify potential challenges.
Audit checklist:
- Page inventory: List all Elementor-built pages and posts
- Widget usage: Document custom Elementor widgets and features
- Template types: Header, footer, archive, single post templates
- Custom CSS: Note any custom styling that needs preservation
- Third-party integrations: Forms, maps, sliders, and external services
- Dynamic content: Any programmatically generated content
Documentation strategy:
Create screenshots of complex layouts and note special functionality for reference during rebuilding.
Phase 2: The Migration Execution
Step 5: Choose a Lightweight, Gutenberg-Ready Theme
Your theme choice significantly impacts the conversion success and final performance.
Recommended block-ready themes:
- Blocksy: Modern design with excellent performance, best theme for WooCommerce
- Kadence: Excellent Gutenberg integration with customization options
- GeneratePress: Lightweight with strong block editor support
- Neve: Modern design with excellent performance
Theme selection criteria:
- Good performance scores out of the box
- Active development and support
- Compatibility with your required functionality
- Responsive design that works well on mobile
PS: At the moment, I don’t think Full Site Editing (FSE) is ready yet — it still has a long way to go.
Step 6: Install a Gutenberg Block Add-on Plugin
While Gutenberg’s core blocks are powerful, additional block plugins can replace Elementor’s advanced widgets.
Top block plugin recommendations:
- Kadence Blocks: Comprehensive block library with advanced layouts
- Stackable: Modern blocks with unique design options
- Blockera: Advanced mode that turns core blocks into a powerful page builder
- Otter Blocks: Adds extra functionality to the WordPress Block Editor
- Post X: Solid collection of layout for news portal
Essential blocks to replace Elementor widgets:
- Advanced heading blocks with typography controls
- Button blocks with hover effects and styling
- Gallery and image blocks with lightbox functionality
- Testimonial and review blocks
- Pricing table and comparison blocks
- Contact form integration blocks
Step 7: Manually Rebuild Your Header, Footer, and Templates
Start with site-wide templates before moving to individual pages. This establishes your design foundation.
Template conversion priority:
- Header template: Logo, navigation, contact information
- Footer template: Links, contact details, copyright information
- 404 error page: Custom error page design
- Archive templates: Blog, category, and tag page layouts
- Single post template: Individual blog post design
Header reconstruction tips:
- Use Navigation block for main menus
- Site Logo block for branding
- Search block for site search functionality
- Social Links block for social media icons
- Custom HTML block for special elements like phone numbers
Footer rebuilding approach:
- Columns block for multi-column footer layouts
- Navigation block for footer menus
- Paragraph blocks for contact information
- Social Links block for social media
- Custom HTML for copyright notices or special code
Step 8: Recreate Your Key Pages and Posts in the Block Editor
Focus on your most important pages first, then work through secondary content.
Page conversion priority:
- Homepage: Your primary landing page and conversion tool
- About page: Company information and trust-building content
- Services pages: Core business offerings and descriptions
- Contact page: Contact forms and location information
- Blog posts: Individual content pieces and archive layouts
Block editor conversion techniques:
- Columns block: Replace Elementor’s section/column structure
- Group block: Create containers similar to Elementor sections
- Cover block: Hero sections with background images
- Media & Text block: Side-by-side content layouts
- Buttons block: Call-to-action elements
- Gallery block: Image galleries and portfolios
Design consistency tips:
- Create reusable blocks for repeated elements
- Use consistent spacing and typography
- Establish color palette in theme customizer
- Test responsive behavior on multiple devices
- Maintain brand consistency across all pages
Phase 3: Post-Migration Sanitisation
Step 8: Safely Deactivate and Delete Elementor & Its Add-ons
Only remove Elementor after confirming your new Gutenberg site works perfectly.
Safe deactivation process:
- Final testing: Complete QA check of all converted pages
- Performance testing: Verify speed improvements
- Functionality testing: Ensure all features work correctly
- Backup verification: Confirm recent backup exists
- Deactivate Elementor: Keep plugin files initially
- Monitor for issues: Watch for any problems for 24-48 hours
- Delete Elementor files: Remove only after confirming stability
Related plugins to remove:
- Elementor Pro
- Essential Addons for Elementor
- Premium Addons for Elementor
- Any Elementor-specific helper plugins
- Unused themes designed for Elementor
Step 9: Deep Database Cleanup (Removing Unused Assets)
Elementor leaves significant data behind in your wp_options and wp_postmeta tables.
Database cleanup tasks:
- Remove Elementor post meta: Clean up custom field data
- Delete unused images: Remove Elementor-generated thumbnails
- Clean shortcodes: Remove any remaining Elementor shortcodes
- Optimise database: Use plugins like Advanced Database Cleaner for general cleanup
- Clear cache: Purge all caching to reflect changes
For advance user. Warning: Backup your database before running these SQL commands.
- SQL for
wp_postmeta:SQLDELETE FROM wp_postmeta WHERE meta_key LIKE '_elementor%'; - SQL for
wp_options(Autoloaded Data):
SQLDELETE FROM wp_options WHERE option_name LIKE 'elementor%';
Note: If you are uncomfortable with SQL, use a plugin like Advanced Database Cleaner and search for “Elementor” in the “Options” scan.
Are There Automated Conversion Tools? (The ‘One-Click’ Myth)
Exploring AI Conversion Tools: Pros and Cons
Several tools claim to automate Elementor to Gutenberg conversion, but the reality is more complex.
Available conversion tools:
- Elementor to Gutenberg converter plugins: Limited effectiveness
- AI-powered conversion services: Expensive and often inaccurate
- Manual import/export tools: Better for content migration
Pros of automated tools:
- Faster initial conversion for simple layouts
- Bulk processing of multiple pages
- Preserves basic content structure
- Reduces manual work for standard elements
Cons of automated tools:
- Often breaks complex layouts and styling
- May not preserve custom CSS or animations
- Limited support for advanced Elementor widgets
- Requires significant manual cleanup afterward
- Can introduce performance issues or bugs
Understanding the ‘Elementor Blocks for Gutenberg’ Plugin (The Hybrid Approach)
This plugin attempts to bridge Elementor and Gutenberg by converting Elementor widgets into Gutenberg blocks.
Hybrid approach benefits:
- Preserves existing content structure
- Allows gradual transition
- Maintains some Elementor functionality
- Reduces immediate conversion work
Hybrid approach drawbacks:
- Doesn’t eliminate Elementor dependency
- May not improve performance significantly
- Can create compatibility issues
- Complicates long-term maintenance
Recommendation:
While hybrid approaches can work temporarily, full conversion to native Gutenberg provides better long-term benefits.
Post-Conversion: Testing and Final Optimisation
Conducting a Thorough Quality Assurance (QA) Check
Systematic testing ensures your converted site meets quality standards before going live.
QA testing checklist:
- Visual accuracy: Compare new site to original designs
- Functionality testing: Verify all interactive elements work
- Form testing: Ensure contact forms and lead capture work
- Navigation testing: Check all internal and external links
- Search functionality: Verify site search works correctly
- Performance testing: Confirm speed improvements achieved
Content verification:
- All text content transferred correctly
- Images display properly with correct alt text
- Videos and embedded media function
- Testimonials and reviews preserved
- Contact information accurate across all pages
Testing for Mobile Responsiveness and Cross-Browser Compatibility
Internet users heavily favor mobile devices, making responsive testing crucial.
Mobile testing priorities:
- Touch interface: Ensure buttons and links are easily tappable
- Loading speed: Test performance on slower mobile connections
- Navigation: Verify mobile menus work smoothly
- Content readability: Check font sizes and spacing
- Image optimisation: Ensure images load quickly and display correctly
Browser compatibility testing:
- Chrome: Most popular browser in the world
- Safari: Important for iPhone users
- Firefox: Secondary browser testing
- Edge: Microsoft browser compatibility
Pushing Your Staging Site Live
Moving from staging to production requires careful planning to minimize downtime.
Go-live process:
- Schedule maintenance window: Inform users of potential downtime
- Final backup: Create comprehensive backup before switch
- DNS considerations: Plan for any domain changes
- SSL certificate: Ensure security certificates work correctly
- Redirects: Set up any necessary URL redirects
- Cache clearing: Purge all caching services
- Monitor closely: Watch for issues in first 24 hours
Post-launch monitoring:
- Check Google Search Console for crawl errors
- Monitor website analytics for traffic drops
- Test all conversion forms and contact methods
- Verify email functionality works correctly
- Watch for broken links or missing content

Post-Migration SEO Audit: The Ultimate Checklist & Guide to Traffic Recovery
Is Making the Switch Worth It?
Converting from Elementor to Gutenberg requires significant effort, but many find the performance improvements, cost savings, and simplified maintenance make the investment worthwhile.
The switch makes sense if:
- Your site speed is impacting SEO or user experience
- Elementor licensing costs strain your budget
- You want to reduce plugin dependencies and conflicts
- Your hosting performance could benefit from lighter resource usage
- You’re planning a site redesign anyway
Consider keeping Elementor if:
- Your site is highly complex with custom widgets
- You lack technical resources for conversion
- Elementor’s advanced features are critical to your business
- Your current site performance is acceptable
This process is powerful, but it requires a careful, technical hand to preserve your design and SEO. If you want to get all the performance benefits of Gutenberg without the headache of a manual migration, our team can help.